
How to Cut Baseboard Heater Covers
DIY! Cut Custom Lengths in a Snap
Having trouble finding covers that fit your baseboard heaters? Worried you might have to hire a contractor or get custom covers? Skip all of that nonsense and cut your covers to any length yourself--simple and quick--with our step-by-step guide.
Baseboard heater cover lengths weren’t standardized until about 60 years ago. Today they come in standard lengths of 2-7 feet, and sometimes 8 and 10 feet. However, if your house is older than 60 years, there’s a good chance that you’ve had a hard time finding a standard cover that fits your heaters.
Not sure what size you need? Find out here.
When you need something that’s in between standard lengths, you don’t have to break the bank for a custom job. All you have to do is a bit of cutting. But never fear, it’s not hard to do. Head to the garage for a few tools and you’ll be in business in no time.
Here’s what you’ll need:
- Hand shears capable of cutting 22 gauge steel
- Metal file
- Pliers
- Tape measure
- Masking tape to mark the line on the panel
- Sharpie marker
- Gloves
How to Cut Baseboard Heater Covers: Step-by-Step Instructions
1. Start with the standard size cover that is just larger than the size you need.
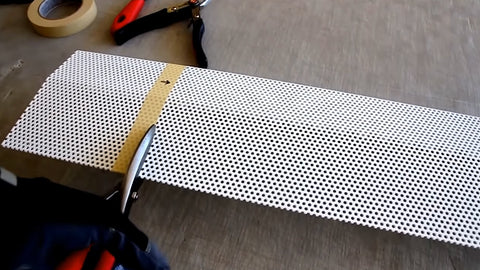
2. Use the tape measure to measure out the size you need, then mark it with the Sharpie
3. Mark a straight line across the entire cover on the Sharpie mark with masking tape [Tip: It’s easy to mark off a straight line on the cover if you use the centers of the holes to help guide you.]
4. Mark which side of the tape you should cut on (usually the right side) with an arrow so you remember which side your measurement was on
5. Cut with the hand shears starting on the back side of the cover (make small cuts, especially around 90 degree turns). Use two hands to get the right amount of force.
6. Once you are ready to turn and cut the front of the cover, turn it over and start cutting from the bottom until you meet your first cut and the excess cover falls away.
7. Finish the edge by using pliers to bend back any edges that were bent during the cutting
8. Use a metal file to take down any burrs or sharp edges
With your cover cut to the right length, all you have to do is place the cover and end caps over your old baseboard heater and you’re done. It doesn’t take lots of money or time to learn how to cut baseboard heater covers to a custom cut length. A little DIY and a few hours and you can have new covers throughout your house.
Learn other aspects of how to prepare and install your new baseboard covers.